

 You have visited many sites that have vertical menus that have vertical navigation menu fixed at the sides of the pages. I am now presenting a stylish and fixed navigation menu that you can fix at the sides of your webpage on Blogger blog. This navigation menu will stay in place even when the reader wants to scrolls down it doesn't interfere with the contents of the webpage. This menu contains five icons that on hover scroll out to show their purpose, for example the home icon on hover shows out the 'Home Page'. The Five icons are for Home, Services, Portfolio, Contact Us and About. One thing important that you cannot change the icons but you can change the text for each icon.
 This navigation menu is made up almost completely of Css3 with just one image and is easy and quick to install. Below you can see a live demo, hover over the icons to see the scroll out effect.

Let's Start How To add Vertical Navigation Menu:
Note: Always Backup your Template before editing it.
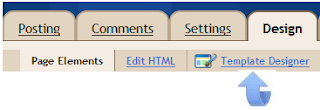
Step 1. sign in in to Your Blogger account on Dashboard Click Design> Template Designer> Advanced> Now scroll to the Add Css Option as shown below.
(If your using the new Blogger dashboard click the drop down menu for your blog, then layout, then template designer)
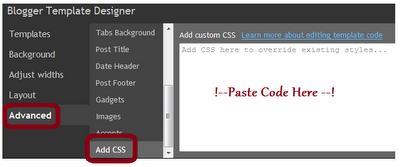
Step 2. After it Paste the following code into the Css section:
/* CSS Style for Horizontal Menu - info @ http://www. learningitech.com*/
#hor {
list-style:none;
padding:0;
margin:0;
}
#hor li {
float:left;
padding:5px;
}
#hor a {
display:block;
height: 12px;
text-indent:-999em;
}
#hor a.home {
width:46px;
background:url(vHome.gif) no-repeat 0 0;
}
#hor a.download {
width:94px;
background:url(vDownload.gif) no-repeat 0 0;
}
#hor a.contact {
width:74px;
background:url(vContact.gif) no-repeat 0 0;
}
/* CSS Style for Vertical Menu */
#ver {
list-style:none;
padding:0;
margin:0;
}
#ver li {
padding:2px;
}
#ver li a {
display:block;
height:12px;
text-indent:-999em;
}
#ver a.home {
width:47px;
background:url(hHome.gif) no-repeat 0 0;
}
#ver a.download {
width:95px;
background:url(hDownload.gif) no-repeat 0 0;
}
#ver a.contact {
width:74px;
background:url(hContact.gif) no-repeat 0 0;
}
.clear {
clear:both;
}
*{
/* A universal CSS reset */
margin:0;
padding:0;
}
#navigationMenu body{
font-size:14px;
color:#666;
background:#111 no-repeat;
/* CSS3 Radial Gradients */
background-image:-moz-radial-gradient(center -100px 45deg, circle farthest-corner, #444 150px, #111 300px);
background-image:-webkit-gradient(radial, 50% 0, 150, 50% 0, 300, from(#444), to(#111));
font-family:Arial, Helvetica, sans-serif;
}
#navigationMenu li{
list-style:none;
height:39px;
padding:2px;
width:40px;
}
#navigationMenu span{
/* Container properties */
width:0;
left:38px;
padding:0;
position:absolute;
overflow:hidden;
/* Text properties */
font-family:'Myriad Pro',Arial, Helvetica, sans-serif;
font-size:18px;
font-weight:bold;
letter-spacing:0.6px;
white-space:nowrap;
line-height:39px;
/* CSS3 Transition: */
-webkit-transition: 0.25s;
/* Future proofing (these do not work yet): */
-moz-transition: 0.25s;
transition: 0.25s;
}
#navigationMenu a{
background:url('https://blogger.googleusercontent.com/img/b/R29vZ2xl/AVvXsEheoiL8HR_WLCTk59dFRTiZu_azJ-0HSxPE3KDLCl984ZaX828SxSYhv8hVwYjNhCRjmZOtSJgAT8s7c_btqkJMkMSKl06_ce7LflSrgyvCWIRXOuleF40cxyU_825AJXM5Ph-j2ux7sAg/s1600/navigation.jpg') no-repeat;
height:39px;
width:38px;
display:block;
position:relative;
}
/* General hover styles */
#navigationMenu a:hover span{ width:auto; padding:0 20px;overflow:visible; }
#navigationMenu a:hover{
text-decoration:none;
/* CSS outer glow with the box-shadow property */
-moz-box-shadow:0 0 5px #9ddff5;
-webkit-box-shadow:0 0 5px #9ddff5;
box-shadow:0 0 5px #9ddff5;
}
/* Green Button */
#navigationMenu .home { background-position:0 0;}
#navigationMenu .home:hover { background-position:0 -39px;}
#navigationMenu .home span{
background-color:#7da315;
color:#3d4f0c;
text-shadow:1px 1px 0 #99bf31;
}
/* Blue Button */
#navigationMenu .about { background-position:-38px 0;}
#navigationMenu .about:hover { background-position:-38px -39px;}
#navigationMenu .about span{
background-color:#1e8bb4;
color:#223a44;
text-shadow:1px 1px 0 #44a8d0;
}
/* Orange Button */
#navigationMenu .services { background-position:-76px 0;}
#navigationMenu .services:hover { background-position:-76px -39px;}
#navigationMenu .services span{
background-color:#c86c1f;
color:#5a3517;
text-shadow:1px 1px 0 #d28344;
}
/* Yellow Button */
#navigationMenu .portfolio { background-position:-114px 0;}
#navigationMenu .portfolio:hover{ background-position:-114px -39px;}
#navigationMenu .portfolio span{
background-color:#d0a525;
color:#604e18;
text-shadow:1px 1px 0 #d8b54b;
}
/* Purple Button */
#navigationMenu .contact { background-position:-152px 0;}
#navigationMenu .contact:hover { background-position:-152px -39px;}
#navigationMenu .contact span{
background-color:#af1e83;
color:#460f35;
text-shadow:1px 1px 0 #d244a6;
}
/*End menu css - info @ http://www.learningitech.com */

<div style='position: fixed; top: 40%; left: 0%;'/>
background:url(hHome.gif) no-repeat 0 0;
}
#ver a.download {
width:95px;
background:url(hDownload.gif) no-repeat 0 0;
}
#ver a.contact {
width:74px;
background:url(hContact.gif) no-repeat 0 0;
}
.clear {
clear:both;
}
*{
/* A universal CSS reset */
margin:0;
padding:0;
}
#navigationMenu body{
font-size:14px;
color:#666;
background:#111 no-repeat;
/* CSS3 Radial Gradients */
background-image:-moz-radial-gradient(center -100px 45deg, circle farthest-corner, #444 150px, #111 300px);
background-image:-webkit-gradient(radial, 50% 0, 150, 50% 0, 300, from(#444), to(#111));
font-family:Arial, Helvetica, sans-serif;
}
#navigationMenu li{
list-style:none;
height:39px;
padding:2px;
width:40px;
}
#navigationMenu span{
/* Container properties */
width:0;
left:38px;
padding:0;
position:absolute;
overflow:hidden;
/* Text properties */
font-family:'Myriad Pro',Arial, Helvetica, sans-serif;
font-size:18px;
font-weight:bold;
letter-spacing:0.6px;
white-space:nowrap;
line-height:39px;
/* CSS3 Transition: */
-webkit-transition: 0.25s;
/* Future proofing (these do not work yet): */
-moz-transition: 0.25s;
transition: 0.25s;
}
#navigationMenu a{
background:url('https://blogger.googleusercontent.com/img/b/R29vZ2xl/AVvXsEheoiL8HR_WLCTk59dFRTiZu_azJ-0HSxPE3KDLCl984ZaX828SxSYhv8hVwYjNhCRjmZOtSJgAT8s7c_btqkJMkMSKl06_ce7LflSrgyvCWIRXOuleF40cxyU_825AJXM5Ph-j2ux7sAg/s1600/navigation.jpg') no-repeat;
height:39px;
width:38px;
display:block;
position:relative;
}
/* General hover styles */
#navigationMenu a:hover span{ width:auto; padding:0 20px;overflow:visible; }
#navigationMenu a:hover{
text-decoration:none;
/* CSS outer glow with the box-shadow property */
-moz-box-shadow:0 0 5px #9ddff5;
-webkit-box-shadow:0 0 5px #9ddff5;
box-shadow:0 0 5px #9ddff5;
}
/* Green Button */
#navigationMenu .home { background-position:0 0;}
#navigationMenu .home:hover { background-position:0 -39px;}
#navigationMenu .home span{
background-color:#7da315;
color:#3d4f0c;
text-shadow:1px 1px 0 #99bf31;
}
/* Blue Button */
#navigationMenu .about { background-position:-38px 0;}
#navigationMenu .about:hover { background-position:-38px -39px;}
#navigationMenu .about span{
background-color:#1e8bb4;
color:#223a44;
text-shadow:1px 1px 0 #44a8d0;
}
/* Orange Button */
#navigationMenu .services { background-position:-76px 0;}
#navigationMenu .services:hover { background-position:-76px -39px;}
#navigationMenu .services span{
background-color:#c86c1f;
color:#5a3517;
text-shadow:1px 1px 0 #d28344;
}
/* Yellow Button */
#navigationMenu .portfolio { background-position:-114px 0;}
#navigationMenu .portfolio:hover{ background-position:-114px -39px;}
#navigationMenu .portfolio span{
background-color:#d0a525;
color:#604e18;
text-shadow:1px 1px 0 #d8b54b;
}
/* Purple Button */
#navigationMenu .contact { background-position:-152px 0;}
#navigationMenu .contact:hover { background-position:-152px -39px;}
#navigationMenu .contact span{
background-color:#af1e83;
color:#460f35;
text-shadow:1px 1px 0 #d244a6;
}
/*End menu css - info @ http://www.learningitech.com */
Step 3. Now Save template, that's it you have completed the 50% Work as Css added now for the html.
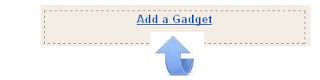
Step 4. After it return to blogs Design or Layout page and click Add a Gadget > Html/Javascript >
Step 4. After it return to blogs Design or Layout page and click Add a Gadget > Html/Javascript >
Step 5. Now Copy and paste the following code into the Html/Javascript gadget:
<div style='position: fixed; top: 40%; left: 0%;'/>
<ul id="navigationMenu">
<li>
<a class="Home" href="http://www.learningitech.com">
<span>Home</span>
</a>
</li>
<li>
<a class="about" href="http://www.learningitech.com/p/about-us.html">
<span>About</span>
</a>
</li>
<li>
<a class="services"
href="ADD SERVICES URL HERE">
<span>Services</span>
</a>
</li>
<li>
<a class="portfolio" href="http://www.learningitech.com/p/archive.html">
<span>Portfolio</span>
</a>
</li>
<li>
<a class="contact" href="http://www.learningitech.com/p/contact-me.html">
<span>Contact us</span>
</a>
</li>
</ul>
</div><a href="http://www.learningitech.com/"><small>Get The Fixed Menu Gadget</small></a>
Step 6.In the end Save the gadget, you can drag and drop the gadget to the bottom of the design page out of the way. That's it Now you have a beautiful Vertical menu being added to your blog. Want to get more Gadgets and Widgets?
Note: Must change the URLs Highlighted with your links.
Step 6.In the end Save the gadget, you can drag and drop the gadget to the bottom of the design page out of the way. That's it Now you have a beautiful Vertical menu being added to your blog. Want to get more Gadgets and Widgets?
Drop Comments below if you found any problem.
3 comments:
@ Jasmine...
Yeah you can add it by changing the image link to alternate image hosted on any blog.....
Image link to change is
'http://1.bp.blogspot.com/-jwOb6rML3W0/TrWP2WBsvaI/AAAAAAAAFFg/NK2hIQSRO-E/s1600/navigation.jpg
@Jasmine
Please email me through
Admin@learningitech.com
very nice scripr
Post a Comment
Important - If you are asking a question click the 'Subscribe By Mail' link below the comment form to be notified of replies.
Note:If you add a link to your comment it will not be published.